

The humble terra cotta pot is a staple of porches, patios, and greenhouses everywhere. But for those of us who love working with our hands, these inexpensive clay vessels are so much more than just dirt-holders—they are the ultimate blank canvas.
Whether you are looking to add a splash of personality to your vegetable patch, create thoughtful custom gifts, or build up inventory for a profitable craft fair booth, clay pot crafts are incredibly rewarding. They are affordable, widely available in dozens of sizes, and completely customizable.
Here are four creative clay pot projects to elevate your garden decor, along with the essential tips you need to make your creations last.
1. The Topsy-Turvy Flower Tower
If you want to make a striking statement in your garden without taking up a massive footprint, the topsy-turvy planter is a showstopper. It creates a whimsical, gravity-defying illusion that is surprisingly easy to build.
How it works: You drive a sturdy piece of rebar deeply into the ground. Then, you thread a large base pot onto the rebar through its drainage hole and fill it with soil. Next, thread a slightly smaller pot onto the pole, tilting it sharply to the left so it rests on the soil of the base pot. Fill that with soil, and thread the next pot on, tilting it to the right.
Best for: Trailing flowers, cascading vines, or even a vertical strawberry patch.
The Crafting Angle: Painting each pot a bright, contrasting color or adding stenciled patterns before assembly turns this from a simple planting technique into a sculptural piece of backyard art.
2. The Coastal Garden Lighthouse
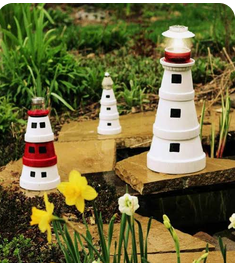
This project is a massive hit at craft fairs and makes a fantastic weekend project. By stacking upside-down pots, you can mimic the tapering shape of a classic lighthouse.
How it works: Choose three terra cotta pots in graduating sizes. Turn them completely upside down and stack them from largest to smallest, gluing them together with a heavy-duty waterproof adhesive. Paint the structure with classic lighthouse stripes (red and white, or navy and white) and paint small black squares for windows. Finally, glue a small solar-powered pathway light to the very top.
Best for: Illuminating garden pathways or adding charm to a front porch. At night, the solar light clicks on automatically, bringing the lighthouse to life.
3. Custom Chalkboard Herb Planters
If you love growing your own kitchen herbs—or know someone who does—this is a sleek, highly giftable project that costs pennies to make but carries a high perceived value.
How it works: Take small (4-inch to 6-inch) clay pots and paint the outside with black chalkboard paint. You can either paint the entire pot or use painter’s tape to leave a neat terra cotta rim for contrast. Once dry and cured, use a white chalk pen (which won’t smudge like traditional chalk) to hand-letter the names of the herbs: Basil, Rosemary, Thyme, Cilantro.
Best for: Windowsill gardens. These are phenomenal sellers if you craft for profit. Bundle three pots together tied with rustic twine, and you have a perfect, ready-to-sell gift set.
4. Whimsical Garden Toadstools
Tuck a little magic among your vegetable rows or flower beds with these cheerful, oversized mushrooms. They add a brilliant pop of red to the greenery and are incredibly fun to paint.
How it works: You need one tall, standard clay pot and one wide, shallow terra cotta saucer. Turn the tall pot upside down—this is the mushroom’s stem (paint it white or cream). Place the saucer upside down on top of the stem—this is the mushroom’s cap. Paint the saucer bright red and add bold, white polka dots. Once dry, glue the cap to the stem.
3 Crucial Tips for Crafting with Terra Cotta
Terra cotta is highly porous. It is designed to absorb and release water, which is great for plant roots, but a nightmare for acrylic paint. To ensure your hard work doesn’t peel or blister after the first rainstorm, follow these rules:
- Prep is Everything: Always start by washing your pots to remove dust, and let them dry completely in the sun. Even new pots have a layer of ceramic dust on them that will prevent paint from adhering.
- Seal the Inside: If you are actually going to put soil and a live plant inside the painted pot, you must seal the interior. Use a waterproof clay pot sealer or an aerosol clear coat on the inside. If you skip this, water from the damp soil will seep through the clay and push your beautiful exterior paint right off the pot.
- Protect the Outside: Use outdoor-grade acrylic paints for your designs. Once your masterpiece is finished and fully dry, hit the outside with two coats of a UV-resistant, clear, non-yellowing acrylic sealer. This protects against fading in the sun and chipping in the elements.
Grab a stack of pots, break out the paintbrushes, and see where your imagination takes you. Happy crafting!